


Step-by-Step Guide
Decal Installation Instructions
Proper prep is everything. Follow these steps for a perfect, bubble-free install every time.
What You’ll Need
▶ Rubbing Alcohol▶ Microfiber Cloth▶ Felt-Edge Squeegee▶ Masking Tape▶ Scissors▶ Utility Knife▶ Hairdryer
⚠ Do NOT use ammonia-based cleaners like Windex. They leave a residue that prevents the decal from bonding properly.
Standard Decal Application
1
Clean the surface thoroughly with rubbing alcohol or a 50/50 mix of water and white vinegar. Wipe dry with a lint-free microfiber cloth. Any wax, oil, or residue will prevent adhesion.
2
Prep the decal: lay it face-down and firmly run your squeegee across the entire backing. This ensures the decal bonds fully to the application tape before you peel.
3
Dry fit with masking tape: tape the decal in place and step back to confirm placement. This is your only chance to reposition — do not skip it.
4
Peel the paper backing slowly at a sharp 180° angle back toward itself — not straight out. Keep the decal held against the surface as you peel.
5
Apply using a center-out technique: starting from the middle, squeegee firmly outward toward the edges to push out air and eliminate bubbles.
6
Remove the application tape by pulling it back at a slow, shallow angle. If any part of the decal begins to lift with the tape, press it back down and pull even slower.
Large Decal & Hood Application
1
Clean the surface as described above. For hoods, make sure the surface is completely cool to the touch.
2
Position and mark the center using a strip of masking tape running down the middle of the decal to divide it in half.
3
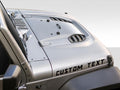
Fold the decal in half vertically along the center line so you can apply one side at a time.
4
Peel the backing off the first half only and apply it, squeegeeing from center outward. Do not apply the second half yet.
5
Remove the center tape divider carefully, then peel the backing from the second half and apply it the same way.
6
On textured surfaces, apply firm squeegee pressure and use a hairdryer on low heat to help the vinyl conform to the texture. Do not use a heat gun.
7
Remove the application tape slowly at a shallow angle. Do a final pass with the squeegee over the entire decal once the tape is off.
Headlight Eye Overlay Application
1
Clean the headlight surface with rubbing alcohol and dry completely.
2
Position and tape the overlay in place. Confirm alignment on both sides before committing.
3
Make relief cuts at the 12, 3, 6, and 9 o’clock positions with a precision blade. These small cuts allow the vinyl to wrap the curved lens without bunching.
4
Peel the backing and apply top-down, pressing firmly into the curves. Work slowly so the vinyl conforms to the contour.
5
Squeegee from center outward, applying extra pressure along the curved edges to ensure full contact.
6
Trim any excess vinyl at the edges with a utility knife. Remove the application tape at a slow, shallow angle.
Troubleshooting
Score a corner gently with your fingernail or a piece of tape to get it started. Cold temperatures can cause this — warm the decal with a hairdryer for 20-30 seconds before trying again.
The surface likely has wax, oil, or residue remaining. Re-clean thoroughly with rubbing alcohol and let it dry completely before reapplying. Temperatures below 50°F can also prevent proper adhesion — try to install in warmer conditions.
Press the decal down firmly with the squeegee before pulling the tape. Pull at a much slower, shallower angle. If pieces continue to lift, warm the tape slightly with a hairdryer — this softens the adhesive and reduces the pull on the decal.
Press firmly with the squeegee, pushing bubbles toward the nearest edge. For small stubborn bubbles, use a pin to pierce the vinyl and release the air, then press flat. Parking in the sun also works — heat naturally eliminates most bubbles within a few days.
Decal Removal
From Glass
- Warm the decal with a hairdryer to loosen the adhesive. Do not use a heat gun.
- Lift a corner using a plastic card or your fingernail. Never use a metal razor blade on glass.
- Peel slowly, reapplying heat as needed. Remove any remaining adhesive residue with Goo Gone or rubbing alcohol.
From Painted Surfaces
- Warm the decal with a hairdryer on medium heat to soften the adhesive underneath.
- Lift with a plastic scraper or your fingernail at a low angle. Never use a razor blade on paint.
- Peel slowly and steadily. Clean any adhesive residue with Goo Gone, then re-wax the area to protect the paint.
Still have questions about installation?
Our team installs this stuff every day. Reach out and we’ll walk you through it.
Available Mon–Fri, 11am to 4:00pm EST.